Vegan Travels: A Week With No Kitchen

Going vegan is easy when you have access to a kitchen and can make all of your own food. But what happens when you go away for an extended period of time, and you’re only eating at restaurants? If you’re going someplace where you speak the language, you’ll have an easier time adjusting any food orders. Going someplace you’re unfamiliar with or don’t speak the language, though, can be a little trickier.

Tomorrow, I’m going on a week-long vacation out of the country, and will be without a kitchen for the first time since I went vegan. If you’re looking for some ideas on traveling while vegan/gluten free, take a look at the guidelines that I’m planning to follow while I’m away. I’ll show you the snacks I’m taking with me too!

Language/cultural barriers:

If you’re visiting a foreign country, do some research before you go. You want to be able to clearly communicate your food preferences and avoid any awkward situations where you have to send back or refuse food, whether you’re in a restaurant or eating in someone’s home. Learn how to say specific phrases like “no cheese, milk, meat, gluten…” in the local language so you know how to order correctly.

Make your special request list: 

Eating at restaurants can be really difficult with food allergies, especially if it’s a price fixed menu or a buffet. You should have a list of easy-to-make foods that most restaurants will have on hand, and can probably make for you by special request. I usually order plain rice or pasta with olive oil and veggies when I can’t find anything to eat at a restaurant, because french fries alone are NOT a real dinner!

Still hungry? Pack some snacks!

When you’re eating every single meal at a restaurant, your diet can start to get a little bit unbalanced. Maybe you’re lacking in protein or you just didn’t get enough food, and a nice vacation is no place to get a visit from the hangry monster. This is why I bring extra snacks with me that are protein-rich, non-perishable, and easy to travel with! Here’s my list:

-Almond milk “juice boxes”: single-serving almond milk containers that I can pack in my suitcase and have each day with cereal, coffee, etc. (like this one, for example)

-Ziploc bag of gluten free rice cereal in case breakfast options are limited–my favorite are these “cocoa snapz”, and they come in an easy-to-carry environmentally friendly bag!

-1 small jar of almond butter to use on toast, fruit, or veggies if I’m feeling a little bit protein deficient

-Small bag of trail mix: cashews, almonds, craisins, and gluten free pretzels

-GoMacro protein bars (my favorite are the Banana + Almond Butter)

Vegans On A Plane

Plane food is just the worst. Airport food is usually not much better. So I pack a full meal for the plane, even if it’s a short flight. You might think it’s only a few hours of traveling, but you’ll still spend time going through customs, finding your luggage, finding a car, driving to the hotel…and by that time it’s been another three hours, you’re starving, and you’re thinking about eating your shoes. Instead, you can save your shoes and pack the following:

-Avocado/veggie sushi–it’s a no-mess lunch option and packs easily in your bag!

-Almond butter + jam sandwich–does not need to be refrigerated so it won’t spoil quickly, and has protein to keep you full

-Banana

-An orange for hydration–planes are very dehydrating, and an orange is a naturally hydrating fruit. Not to mention it’s got tons of immune boosting Vitamin C, which is a great thing for all the germs you come into contact with on a plane!

-I will also buy a large water and a coconut water at the airport to stay hydrated during the flight.


Whether you’re staying home or traveling across the world, I hope you all have a safe and wonderful holiday, and I’ll see you back here next year! 🙂

-Perri

Vegan Gluten Free Jammie Dodgers

I’m going to geek out a little bit right now and tell you all about my favorite TV show, Doctor Who. If you’ve never seen the show, it’s about a two thousand year old space-time-traveling, face-changing alien called The Doctor. He basically saves the universe on a weekly basis with his time machine and various human companions. Now that you’re all caught up, why am I posting about this on Christmas Eve? It’s because the BBC airs a special episode on Christmas Day each year, and it’s a huge television event around the world. I realize that “space-time travel” doesn’t exactly sound very Christmas-ey, but trust me, it’s the best Christmas tradition ever.

In a few episodes, the Doctor mentions that his favorite cookies are Jammie Dodgers, a popular biscuit in the UK. So, what could be a better snack to have while watching the Christmas special than these cookies? I googled the ingredients for Jammie Dodgers and found out they are actually vegan (COOL!) but unfortunately not gluten free. Naturally, I had to create a gluten free and vegan recipe for all of you gluten free Whovians out there. They’re a perfect dessert to have for your holiday dinner, or the part right after dinner when you sneak away to watch the Christmas episode of your favorite show.

jammie dodgers

The Doctor with his Jammie Dodger!

Jammie Dodgers are traditionally made with shortbread cookies and raspberry jam. The recipe below is for shortbread cookies, but I also tested these out with my Vegan Gluten Free Sugar Cookies and they were awesome. Shortbread and sugar cookies are similar, but shortbread cookies have fewer ingredients and are heavier on the butter. I adapted my shortbread recipe from Martha Stewart. 

INGREDIENTS:

2 cups gluten free flour mix: 3/4 cup brown rice flour, 3/4 cup gluten free oat flour, 1/4 cup potato starch, 1/4 cup arrowroot powder

1/2 teaspoon salt

1 cup coconut butter

1/2 cup confectioner’s sugar

1 teaspoon vanilla extract

1 tbsp unsweetened applesauce

1/4 cup cold water

Raspberry jam

DIRECTIONS:

1) Place the cup of coconut butter into a bowl and beat with an electric mixer for about 30 seconds until smooth. Add the sugar and beat for another 30 seconds. Add the vanilla, flour, and salt, and beat the mixture until it is crumbly and everything is incorporated.

2) Add 1/4 cup water and 1 tbsp unsweetened applesauce to the bowl and mix with your hands until completely incorporated. The dough should stick together at this point.

3) Divide the dough in half, wrap each half in plastic, and refrigerate for one hour.

4) Remove from the fridge and let the dough warm up for an hour before rolling it out.

5) Line a cookie tray with parchment paper, and preheat the oven to 325F.

6) Roll out the dough to 1/4-inch thickness on a piece of parchment paper. Use a circle cookie cutter about 3 inches wide to cut out circles from the dough. You should end up with about 20 circles.

Note: Jammie Dodgers are sandwich cookies with jam in the middle. The bottom cookie is a full circle, and the top has a hole cut out of the middle. So if you have 20 circles of dough, you’ll end up with 10 Jammie Dodgers.

7) Take half of the circles and cut a hole out of the middle with a cookie cutter or a knife. The hole can be circular or heart-shaped!

jammie dodgers 2

8) Transfer all the cookies to the cookie sheet and bake at 325F for 15 minutes until golden brown at the edges. Remove from the oven and let them cool for 30 minutes.

9) Spread jam on each of the bottom cookies (the full circles). Place the top cookies (holes in the middle) on top of the jam.

Holiday Sugar Cookies

These cookies are a Chanukah tradition in my house. They are full of sugar, but everyone deserves to indulge a bit during the holidays. Dip them in some coconut “egg” nog, snuggle up next to the fire, and have a wonderful holiday! 🙂

Ingredients: 

For the cookies:

1 cup granulated sugar

½ cup coconut butter

1 tsp vanilla

1 egg equivalent of ener-g egg replacer (1.5 tsp powder + 2 tbsp water)

1 cup gluten free oat flour

¾ cup brown rice flour

1 tbsp arrowroot powder

¼ tsp salt

½ tsp baking powder

2 tbsp cold water

1 tbsp unsweetened applesauce

For the frosting:

1.5 tablespoons almond milk

1 cup powdered sugar

Directions:

1) Soften the coconut butter in the microwave on high for 15 seconds, then stir with a spoon until you get a smooth, creamy paste.

2) Pour the coconut butter and sugar into a bowl and beat with an electric mixer or whisk vigorously.

3) Add the vanilla and ener-g egg replacer, and continue mixing until everything is combined.

4) Add the flour, salt, arrowroot powder, baking powder, and continue mixing until you get a crumbly mixture and everything is incorporated.

5) Finally, add the cold water and applesauce, and mix. The dough should not be wet or sticky, but should hold together well.

6) Divide the dough in half and wrap each part in plastic wrap. Place in the fridge for at least one hour, but you can also freeze the dough for a week if you’re not ready to bake it yet.

7) When you’re ready to bake, the dough needs to be taken out of the fridge and warmed up for about 1-2 hours before you can roll it out successfully. Roll it out to about 1/4 inch thick, and cut shapes out with cookie cutters.

8) Bake at 325F for 15-20 minutes or until golden brown around the edges, and let them cool for 30-45 minutes before frosting.

9) Mix the powdered sugar and almond milk together to make the frosting. Add more sugar to make it thicker, and more almond milk to make it thinner. Frost each cookie and decorate with candy, sprinkles, and chocolate chips.

Peppermint Chocolate Fudge

I’m sticking with my holiday dessert theme to bring you another Christmas treat! I used this really simple recipe from Katy’s Kitchen to make my peppermint fudge. Her recipe makes a basic chocolate fudge, so I put a little holiday spin on it. I replaced the 1 teaspoon of vanilla extract in her recipe with 1/2 teaspoon vanilla extract + 1/2 teaspoon peppermint extract. 

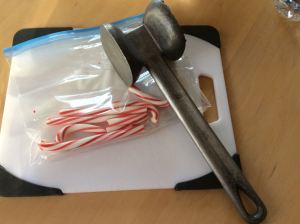
I crushed three full-size vegan candy canes to sprinkle on top of the fudge before putting it in the fridge to set. To crush the candy canes, put them in a sealed ziploc bag, place them on a cutting board, and use a hammer to crush them into small pieces.

candy canes candy canes 2


peppermint fudge

I also made a white chocolate version of this fudge recipe! I used vegan “golden white chocolate” from Organic Nectars.  The color is actually a tan/brown as opposed to white, though it tastes like white chocolate. I used 3 oz of the white chocolate, 2.5 tbsp coconut milk, 1/2 tsp vanilla, and 1/2 tbsp coconut oil for this version. I also sprinkled some crushed up candy canes on top because it’s Christmas!

Mini Vegan Gingerbread House

What’s the point of a gingerbread house if you can’t eat it? Sure, it’s fun to get one of those pre-made kits and decorate it, but I don’t want to stare at my inedible gingerbread house for two weeks and then throw it away. I want to take a few pictures, show it off at my holiday party, and then commence snacking.

Gingerbread has always been off-limits to me because of my various allergies, but this year I’d finally had enough. I was going to find a way to have my gingerbread house and eat it too. When I found a recipe on Minimalist Baker, it was exactly what I was looking for. It is a perfect allergy-friendly gingerbread recipe free of dairy, gluten, eggs, soy, corn, and (my allergy arch-nemesis) cloves. It works nicely for gingerbread house construction or just making some kick-ass cookies, and it made my whole house smell like Christmas!

To make your own gingerbread house, you will need:

1) Minimalist Baker’s Vegan Gluten Free Gingerbread Dough. For Dana’s recipe I used 1.5 cups of gluten free flour blend (1/2 cup brown rice flour, 1/2 cup gluten free oat flour, 1/4 cup arrowroot powder, 1/4 cup potato starch). For the “vegan butter” I recommend using coconut butter (it’s thicker than coconut oil) softened in the microwave for 10-15 seconds and stirred with a spoon until smooth (it should look like melted frosting). I baked the gingerbread house cutouts for 20 minutes at 350F to make sure they would be firm.

Note: I made a double batch of the gingerbread dough recipe to make sure there was enough for the entire house, and had some dough left over for cookies! I ate most of the cookies, but did use a few for my gingerbread house scene. gingerbread 5

2) Cherrybrook Kitchen vegan/gluten free vanilla frosting, or your preferred frosting. The frosting should not be too watery or too hot, or it will melt and the walls will not stick together.  You can make your own frosting by mixing powdered sugar with water or almond milk, and adding more sugar if it’s too runny. The gingerbread recipe link from Minimalist Baker also has suggestions for making your own frosting. Keep in mind that the thicker the frosting is, the better support it will be for your gingerbread house.

3) A 12 inch round cardboard base to place the house on, a square cardboard tissue box to support the walls of the house, and piping bags for the frosting.

4) Vegan/gluten free candy to decorate your house. I used kosher jelly beans that I found in the Chanukah section of my grocery store (they’re kosher because they don’t contain gelatin, so they’re vegan too!), Dandies vegan marshmallows, dairy free chocolate figures from Premium Chocolatiers, and Bob’s candy canes.

5) Vegan-suitable food dye, in case you want to make your frosting different colors to decorate with. I used “India Tree” brand that I found in Whole Foods.

6) Mini gingerbread house template. I used the Swedish House template from this BBC Good Food recipe.

Directions:

1) Prepare the dough according to the instructions on Minimalist Baker. I recommend making a double batch and using the leftover dough for cookies. I refrigerated the dough for two hours before rolling out and baking.

2) Print out the template (it should be about the size of a postcard). Take a sheet of parchment or wax paper and place it over the template. Trace the three wall shapes onto the parchment paper, then cut them out so you have three paper shapes.

3) Take the dough out of the fridge and roll it out about 1/4-1/2 inch thick onto parchment paper or a floured surface. Place the parchment paper wall shape cutouts over the rolled out dough and cut the shapes out of the dough using a sharp knife. Use a spatula to transfer each shape to a cookie sheet lined with parchment paper, leaving about 2 inches of room between each shape since they spread as they bake. Make two of each shape (front and back, two sides of the roof, and two short walls, so you end up with six walls total).gingerbread 2

4) Bake the six walls for 20 minutes to make sure they are firm. Let them cool completely before constructing the house or they will melt the frosting. It’s best to let them cool for at least 12-24 hours (I waited two days before using them for the house) to make sure they’re sturdy enough to stand on the cardboard, or they will fall apart when you try to work with them.

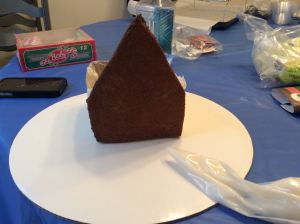
5) Take your regular sized square tissue box and stand it upright so that the opening is on the top. Measure the height of the shortest wall (“B” on the template) on the box, tracing all around with a pen. Cut off the top of the box around the traced line so that the tissue box is only as tall as side “B”.


6) Place a piece of plastic wrap on the cardboard base and put the tissue box base on top of it. Wrap the tissue box in the plastic wrap so that the outside is completely covered. Use two pieces of double sided tape to stick the tissue box to the cardboard base. I put mine closer to one edge of the cardboard circle so I could make a larger “front yard” for the house.

7) Place your frosting into a piping bag and cut off the bottom. Pipe frosting around the base and top edges of the tissue box, and pipe 3-4 dots of frosting in the center of each “wall” of the tissue box. Press each gingerbread wall to its appropriate tissue box wall, and hold it for a few seconds to make sure it sticks. Use frosting for extra glue/support and to fill in any gaps between the walls. Place only the four supporting walls around the tissue box–don’t place the roof on yet!

gingerbread 27 gingerbread 6


8) Let the four supporting walls dry and set for at least 30 minutes before putting the roof pieces on. When you’re ready to place the roof, pipe frosting onto all the top edges of the house before placing the roof on, then pipe more frosting into the spaces between all the walls to make sure everything sticks.

gingerbread 11 gingerbread 10


10) Decorate the house and surrounding cardboard area with your favorite candy and gingerbread cookies using the frosting as a glue.

Then let it dry, show it off, and EAT THAT GINGERBREAD HOUSE!

gingerbread 48gingerbread 65 gingerbread 68gingerbread 72

gingerbread 66


Note: I used gingerbread dough for this recipe, but you can try it with other types of cookie dough too and follow the same steps. My mom made a non-vegan sugar cookie house, and it was awesome (it’s pictured below). My vegan/gluten free sugar cookie recipe will be coming in the next few days if you’re feeling adventurous!

Edit: My sugar cookie recipe is here! 

gingerbread 46

Simple Vegan Latkes

Happy Hanukkah! The miracle of Hanukkah is all about the oil that burned for eight days when it was supposed to only last for one, and how it saved the temple in Jerusalem. We celebrate by frying everything and anything in oil and lighting the menorah for eight nights. So if you want some real latkes for Hanukkah, don’t be stingy with the oil. That’s the whole point!latkes 1

Ingredients:

4 russet potatoes

1 white or sweet onion

1/4 cup potato starch

1 tsp baking powder

1/2 tsp salt

1/2 tsp pepper

Grapeseed or canola oil for frying

Directions:

1) Wash and peel the potatoes and onion. Use a grater or food processor to grate the potatoes, then place them in a colander over a bowl or paper towel to drain the liquid out. You can also press the grated potato between two layers of paper towels to remove more liquid, which helps the latkes bind together. Once drained, place the potatoes in a large mixing bowl.

2) Peel and dice/grate the onion and place in the mixing bowl with the potatoes.

3) Add the baking powder, potato starch, salt, and pepper and mix well.

4) Pour one inch of oil into a frying pan and place on high heat for a minute or two. Once the oil starts to bubble, use a medium-sized ice cream scoop to place balls of the grated potato mixture into the oil, about 3-4 at a time.

5) Let the potatoes fry for about 2-3 minutes on each side, until they are golden brown, and be careful not to burn them. Flip them using a spatula since they are delicate and will break apart with too much pressure. When they are done, remove them from the oil and drain on a plate covered with a paper towel.

6) Serve them hot with lots and lots of applesauce!

Vegan Brie and Apple Sandwich

OH. MY. CHEESE.

brie sandwichThis is my holy grail of cheeses. I never thought this was even possible. But I was wrong! Vegan brie exists, and I have found it in my local Whole Foods. The taste and texture are incredible. Better yet, it is made from almonds instead of tofu, so that’s a win for those of us with a sensitivity to soy. If you can find it, it’s the “Soft Ripened” cheese from Kite Hill, and they have several other varieties that are also amazing. I’ve heard of some other companies that make vegan cheeses similar to this one and am now on a mission to try as many as I can. But we’re getting off topic, so let me tell you about this sandwich.

THIS SANDWICH. The first time I tried this sandwich with real brie, I loved it so much that I had it every day for a month. It’s such a simple sandwich, but it is perfection. It makes me feel like Remy in Ratatouille, discovering the different flavor combinations I can make with a simple cheese.remy ratatouille

The minute I tried the Kite Hill cheese I knew I could finally have my favorite sandwich again. The mild, nutty flavor of the brie cheese pairs perfectly with sweet and tart green apples. It is simple, flavorful, and amazing.brie jam

My dad and I have been snacking on this cheese for days. I pair it with crackers, cashews, and raspberry jam (pictured on the left), because why not. Brie baked in pie dough? YES I CAN. It’s happening next week. Really, just put it on everything. The possibilities are endless! If you have some great brie-inspired recipes or vegan cheeses that you love, please share them in the comments below! 🙂

Ingredients:

Kite Hill “Soft Ripened” almond milk cheese, sliced

1 green apple, sliced

Gluten free bread, toasted

Balsamic vinaigrette or honey mustard (optional)

Tiramisu

Yes, you read that correctly. I have managed to recreate one of my all-time favorite desserts in a vegan, gluten free, and soy free form. It tastes just like the real thing and is unbelievably delicious.  To all of you skeptics out there: CHALLENGE ACCEPTED. Go ahead, make this cake and tell me it doesn’t change your life. I dare you.

If you can’t tell yet, I am beyond excited about this cake. It uses homemade ladyfingers soaked in rum and coffee for the cake base, layered with a “mascarpone cheese” of coconut whipped cream, and finally gets dusted with cocoa powder for a hint of chocolate. It takes some work to make this cake but it is SO worth it.

Ingredients

For the Ladyfingers:

1 cup gluten free oat flour

¾ cup brown rice flour

1 tbsp arrowroot powder

2 tsp baking powder

½ tsp salt

1 Ener-G egg (1.5 tsp ener-g egg replacer powder + 2 tbsp water)

½ cup unsweetened almond milk

½ tsp vanilla extract

2 tbsp unsweetened applesauce

½ cup maple syrup

For The Coconut Whipped Cream:

4 5-oz cans of coconut cream, chilled overnight in the refrigerator

2 tbsp maple syrup

1 tsp vanilla

Other Ingredients:

2-4 tbsp cocoa powder

1/2 oz rum

1 cup brewed or instant espresso

You will also need:

1 small mesh sieve

2 medium-sized mixing bowls

1 hand-held electric mixer

1 piping bag

Small casserole dish

Directions:

*Make sure you chill the coconut cream cans in the fridge overnight before you start baking. They need to be cold so that the cream is solid enough for whipping. Put them in the fridge right side up so the cream solidifies on the top.

  1. Preheat the oven to 350F.
  2. Make the ladyfingers first. Add all of the dry ingredients for the ladyfingers to a mixing bowl and stir with a wooden spoon until combined. Add the wet ingredients and stir until you have a sticky batter.
  3. Transfer the batter into a piping bag and cut the bottom off so you have a dime-sized hole. Pipe the batter onto a tray lined with parchment paper in 4×1 inch ovals that look like this:IMG_0311
  4. Bake these for 25 minutes at 350F until golden brown. They should be a little crunchy on the outside and spongy on the inside. When they’re ready, take them out of the oven and transfer them to a wire rack or plate to let them cool completely.
  5. Open the 4 cans of coconut cream. There should be a solid layer of cream on the top of the can, and below it will be a layer of thin watery liquid. You only need the solid cream on the top plus 1 tbsp of the liquid milk. You can save the liquid to use later in other recipes or toss it. IMG_3426
  6. Scoop out the solid cream from all four cans + 1 tbsp liquid milk into a mixing bowl. Add the 2 tbsp maple syrup and 1 tsp of vanilla. Using a hand-held electric mixer, beat the cream until all the ingredients are incorporated. Start out on a slow speed and gradually increase until you see the cream start to become smoother. If you mix it for about 5-10 minutes, you’ll start to see it forming stiff peaks and looking more like a “whipped cream”. IMG_0317
  7. Using ground or instant espresso, make 1 cup of espresso (or regular coffee if you prefer).
  8. Pour 1/2 oz of spiced rum (I like Bacardi Gold or Captain Morgan) into the coffee and stir. You can measure the rum by pouring it into a regular measuring glass or using a typical shot glass (they range from 1 to 1.25 oz) and filling it up halfway.
  9. Dip several ladyfinger cookies into the coffee-rum mixture and place it into your casserole dish until you have one layer of cookies lining the bottom of the dish. It’s ok if you need to break some cookies apart to get an even layer, since the cookies will bind together later.
  10. Pour half of the coconut cream over the layer of cookies and spread evenly with a rubber spatula.
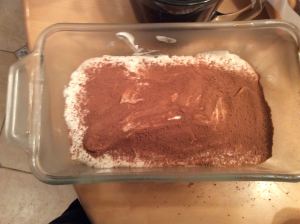
  11. Using a small mesh sieve, dust a thin layer of cocoa powder over the top of the coconut cream. IMG_0326
  12. Add another layer of coffee-rum soaked ladyfingers on top of the cocoa powder. Then add the rest of the coconut whipped cream, and top with one more layer of cocoa powder with the sieve. Your end result should look something like this:IMG_0327
  13. Cover with tinfoil or plastic wrap and place the tiramisu in the fridge for 3-4 hours to let it solidify. It should be cut into small squares and served cold. 


This post is a part of the Virtual Vegan Potluck, an online party for vegan and veg-friendly food bloggers to share recipes together. I’m so excited to be a part of it and for those of you following along with the potluck, your navigation buttons to the previous and following blog posts are below:

vvpback vvpforward


<–Click on that button to return to the previous post in the potluck.


Click on that button to go to the next post in the potluck. –> 


The Liebster Award!

I am so excited to have been nominated for the Liebster Award by Becky at Quinoa and Cookies, a fantastic gluten free recipe blog. This award recognizes new bloggers with good content, and it’s great to know that others are enjoying what I post! I think this award is so much fun because it asks the nominee to recognize more blogs with great content so we can keep discovering new bloggers! First, I’ll answer Becky’s questions from her Liebster Award post, and then I’ll share my nominations at the end.

1. Why did you start blogging?

When I went vegan, I had a really difficult time figuring out what to eat. My culinary skills basically included kraft mac and cheese and ordering takeout. I read so many food blogs, both vegan and non-vegan, to learn how to cook and substitute eggs/dairy/gluten effectively, and my life has been made so much easier because of it. I wanted to share recipes that I created and tips that I’d picked up because of how much those other blogs had helped me!

2. Coffee or tea?

Coffee! Always coffee. I’ll only drink decaf green tea if I’m sick or having trouble sleeping.

3. Where is your favorite place you have traveled?

I went to Italy a few years ago (during my pre-vegan, post-kosher days, so I ate basically everything) and absolutely loved it! I spent two weeks on an archaeological excavation in Tuscany which was an incredible experience, and then toured Rome for two days. I have always wanted to go back and see more of the country!

4. What would be your superpower of choice?

Time Travel!

5. What is your least favorite chore?

I hate taking out the garbage.

6. What is your favorite season?

Summer! I love going to the beach.

7. Who would play you in a movie?

Anne Hathaway–she’s my celebrity doppelganger.

8. Beach or mountains?

Definitely the beach. That’s twice I’ve mentioned it now, whoops.

9. What is your favorite cuisine?

I think it’s a tie between Indian and Mexican food, but it’s so hard to find vegan Indian food where I live!

10. If you could adopt any animal as a pet (and it would be happy and healthy and safe, etc), what would you pick?

I have always wanted a teacup pig! So cute.

11. What is your number one guilty pleasure?

Occasionally I’ll watch those awful reality shows on TLC…


Now, here are some random facts about me:

1) I have an allergy to cloves, and cannot have anything that’s “pumpkin spiced”. I never use cloves in any of my recipes!

2) I studied dance for most of my life and have performed onstage with about 8 different styles–ballet, tap, jazz, modern, lyrical, hip hop, Latin-Israeli, and Indian dance. Indian dance was my favorite! It is SO much fun.

3) I took a year of Hieroglyphic Egyptian in college, and it was the coolest language ever. I briefly wanted to be Indiana Jones.

4) My favorite TV show of all time is Doctor Who, and my favorite doctor is the eleventh.

5) I’ve never broken a bone (yet!).

6) My favorite Disney princess is Tiana from Princess and the Frog!

7) I am currently listening to the soundtrack from the musical Once on repeat because it’s amazing.

8) My favorite food is chocolate lava cake.

9) I helped run a Model UN conference in college, and Oprah showed up for a surprise visit to check on some students she had sponsored to go to the conference. Coolest day ever.

10) Dream vacation: Australia!

11) I’ve visited the lowest point on the earth, the Dead Sea!

And now, for my nominees!

1) The Impossible Eater

2) This Vegan Whimsy

3) The Confidential Foodie

4) The Fodmapper

My questions for the nominees are:

1) What inspires you to write or photograph on your blog?

2) If you could live anywhere in the world, where would you go?

3) What is your favorite TV show?

4) Which character from books, television, or movies do you identify with?

5) What would be your superpower?

6) What is your ultimate comfort food?

7) What is your most memorable trip?

8) What is your favorite inspirational quote?

9) Beach or mountains?

10) What is your spirit animal?

11) If you could have any job in the world for a week, what would you choose?

Rules

1. Create a post dedicated to the award, linking back to your nomination, and display the award in the post, or elsewhere on your blog.  (Google the Liebster Award for more images to choose from!)

2. Answer the eleven questions I provided, then include eleven random facts about yourself — remember, the goal is to get to know your fellow bloggers a little bit better.

3. Nominate blogs that you feel deserve the award, and have fewer than 1,000 followers.

4. Create a list of new questions for your nominees, and explain the rules in your own post.

5. Let your nominees know via a comment on their blog, and have fun!


Thank you so much to Becky from Quinoa and Cookies for nominating me, and I look forward to hearing all about my nominees!

Banana Bread

Banana bread is a staple at holiday dinners in my house. My mom has perfected her recipe over many years but it’s definitely not suitable for vegans. It took me about five attempts to recreate her recipe for my needs, but I finally did it and it was taste-tester approved at Thanksgiving dinner! You can eat this banana bread for breakfast, or maybe with some dairy free ice cream for dessert…

Ingredients

1/2 cup gluten free oat flour

1/2 cup brown rice flour

2 tbsp potato starch

2 tbsp arrowroot powder

1/2 tsp salt

1/2 tsp ground cinnamon

1 tsp baking soda

1/2 cup vegan shortening (I use Nutiva)

1 cup maple syrup

2 ripe bananas

1/2 cup vegan chocolate chips (optional)

Directions:

Preheat the oven to 350F.

Using an electric mixer, mix the oat flour, brown rice flour, potato starch, arrowroot powder, salt, cinnamon, and baking soda. Add the shortening and maple syrup, and mix until combined. Mash the bananas with a fork in a separate bowl until smooth. Add the banana to the rest of the ingredients and mix for 3-5 minutes until the batter is smooth and the shortening and bananas are completely incorporated. Add the chocolate chips and mix for five seconds so they are evenly distributed in the batter.

IMG_0331Grease two small loaf pans (6 in. x 3 in.) with coconut oil or shortening. Fill each loaf pan 2/3 full with batter. Bake on a tray in the oven for 30 minutes, or longer if you have a larger loaf pan. The banana bread is ready when you can insert a toothpick into the middle of the loaf and it comes out clean.

When ready, remove from the oven and let it cool for 20 minutes in the loaf pan, then remove from the loaf pan and transfer to a plate. Slice and serve warm.


IMG_0333